


What do we know about themes?
The main purpose of a theme is to promote student learning. Successful themes always connect the different subject areas into relevant and purposeful units of study. Regardless of the topic, the number of subjects that are integrated, or the amount of time spent on the theme, the learning that takes place is heightened when the students are fully engaged in the process.
The following are two craft ideas that are easily transported from theme to theme. They are fun to make and help the students to reflect their learning.
Banners
These banners can be made to any length and hung from the ceiling. Any thin, flat object (paper, fabric, leaves, etc.) can be embedded between two layers of wax paper. As a hot iron is involved in the process, this is a good project to have a student teacher, parent helper or assistant to help you with.
Materials (for a snowflake banner)
- one iron and an extension cord
- 2 boxes of wax paper
- scissors
- stapler
- hole puncher
- string
- white paper
- 12 x18 sheets of coloured construction paper
- several large sheets of plain newsprint
Process
1. Have each student cut out a number of snowflakes in a variety of sizes and shapes.
2. Store each student’s snowflakes (a paper clip or folded piece of paper will keep them together nicely) until s/he is ready to assemble a banner.
3. Place a wad of newsprint on a table. This will protect the table from the heat of the iron and will absorb some of the wax.
4. Tear off a piece of wax paper and place it on the newsprint.
5. Have a student spread his snowflakes out on the paper.
6. Tear off a second piece of wax paper and place it on top of the snowflakes. Check to see that the two sheets of wax paper are aligned and that the snowflakes are not sticking out at the edges.
7. Place one sheet of newsprint on top to absorb the wax.
8. Gently iron across the banner on medium heat.
9. Remove the iron and the top piece of newsprint. Check to see that the wax paper sheets have sealed together. If they did not seal it is because the iron was too hot (burned off the wax) or you held the iron in one place for too long.
10. Fold two pieces of construction paper in half. Staple each one over an end of the banner. This conceals the ends of the wax paper and adds weight so that it will hang well.
11. Punch a hole at the top and hang the banner.
Other ideas
- Use coloured tissue paper for the snowflakes.
- Press and dry autumn leaves for a leafy banner.
- Cut out a red maple leaf, use red construction paper for the ends and make the Canadian flag.
- Cut out any paper shapes that connect with your theme: pumpkins, hearts, flowers, planets, stars and moons, fish, birds, animals, etc.
3-D Models
One of the best hooks for capturing student interest within a theme is to learn about an animal. The following instructions can be adapted to fit the shape of many creatures your class might want to learn about.
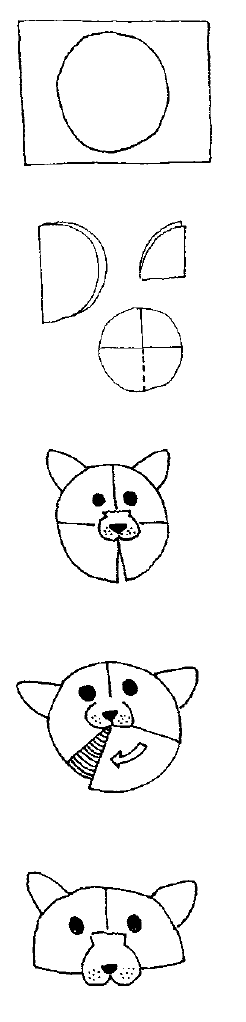 Round Masks
Materials (for a cougar)
- construction paper (gray, brown, yellow, black)
- scissors
- glue sticks
Process
1. Look at some pictures of cougars. Pay particular attention to the positioning of the eyes, ears and nose.
2. Have each student trace a large circle about 25 cm in diametre onto gray or brown construction paper and then cut the circle out.
3. Fold the circle into quarters and then open it flat and cut along one fold line from the edge to the center.
4. Overlap the two quarters adjacent to the cut line and glue to form a shallow cone.
5. Make ears using rounded triangles about 7 – 9 cm tall.
6. Make the nose by cutting a rectangle about 15 cm long and 7 cm wide. Round the corners at one end of the rectangle. Fold the snout in half and glue on the face. Glue a black triangle to the end of the snout.
7. Add eyes and whiskers with markers or glue and construction paper.
Other ideas
- This model can easily be adapted to any animal with a roundish face (e.g.: sea otter, beaver, squirrel, groundhog, bear, wolf)
- Wings and bodies can be attached as well.
Square Masks
Follow the directions for the round masks but substitute a square piece of paper for the circle. Make the folds on the diagonal. You will end up with an elongated shape that lends itself well to making caribou, deer, buffalo, etc.
ABOUT THE AUTHOR
Brenda Boreham
Brenda is the Literacy Resource Teacher at her school. This part-time position allows her to plan fun literacy events when she isn’t busy in her own classroom.
This article is from Canadian Teacher Magazine’s November 2009 issue.